|
 Coffee Filter Angel Craft - These little angels are very simple to make and very inexpensive. Coffee Filter Angel Craft - These little angels are very simple to make and very inexpensive.
What you will need: Three coffee filters for each angel, one large bead for the head, a pipe cleaner, doll hair, and paint.
What to do:
- Cut the pipe cleaner in half. Gather up one coffee filter across the width and wind one of the halves of pipe cleaners around it to make the wings.
- Cut about 10 strings of doll hair about 6 inches long. Wrap the other half of the pipe cleaner around the middle of the doll hair lengths leaving about 1 1/2 of pipe cleaner at one end.
- Wind the 1 1/2 length around to form a halo. Insert the other end of the pipe cleaner through the center of a coffee filter and then through the center of the bead and then through the center of another coffee filter. Bend a loop in the end of the pipe cleaner so the coffee filters and bead dont fall off.
- Bring the top coffee filter down around the bead and gather it around the bottom of the bead to form the neck of the angel. Attach the wings to the body just below the bottom of the bead. Wind the ends of the pipe cleaner from the wings around to form the arm.
- Paint the angel with water colors or glitter glue and draw on a face.
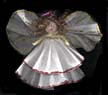
 Poinsettia Flower Angel Craft Poinsettia Flower Angel Craft
What you will need: Silk poinsettia flowers, 1 1/2 red ribbon, 1 1/4 wooden ball head, fake hair, two small beads for the feet, 6mm red ribbon, small bird, hot melt glue, white glitter pipe cleaner.
What to do:
- Remove the center of the poinsettia flower so that a pipe cleaner can be inserted into the center.
- Insert the pipe cleaner through the center of the flower. Pull it all the way through the flower from the top until you have only 1 showing. Bend the 1 length left to form a circle.
- Glue the flower petals down toward the pipe cleaner so that they dont stick out too far.
- Tie a bow using the 1 1/2 ribbon onto the pipe cleaner just above the poinsettia petals. Pull the bow ends around to form the arms of the angel and glue in place. Glue a small bird onto the arms.
- Next thread the wooden head onto the pipe cleaner just above the bow. Pull the head down tight and wind the remaining pipe cleaner around on top of the head to form a halo.
- Glue on the hair.
- Tie two ribbons with beads attached to the bottoms onto the loop under the poinsettia flower to form legs and feet.
- Glue a loop of ribbon to the back of the angel to hang.
 Legend of the Candy Cane Card Craft - This craft project makes a great Christmas card. It can also be used as gifts to give people in nursing homes and shelters as an outreach. Legend of the Candy Cane Card Craft - This craft project makes a great Christmas card. It can also be used as gifts to give people in nursing homes and shelters as an outreach.
What you will need: Paper, fine markers, candy canes, and red ribbon.
What to do: Print out the pattern. (There is a picture for younger children below.) Cut around the solid line. Fold inward toward the picture at the dotted line. Punch holes on the folded flap. Tie a candy cane on the side by threading ribbon through the holes. (You can also use candy canes made from pipe cleaners and beads for people who are not allowed to eat candy.) Color the picture.
Lace Angel Craft
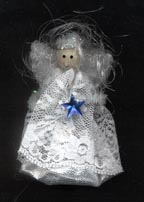 What you will need: Wooden head bead, white or clear pipe cleaners, wings, 2 1/2 lace, silver material, star bead or sequin, white doll hair, very thin florist wire. What you will need: Wooden head bead, white or clear pipe cleaners, wings, 2 1/2 lace, silver material, star bead or sequin, white doll hair, very thin florist wire.
What to do:
- Cut about a 5 length of hair. Insert a 6 1/2 or longer pipe cleaner into the head bead. Bring it up through the hole and wrap it around the center of the length of hair leaving about an inch of pipe cleaner at the top. Put a dab of hot melt glue on the pipe cleaner where you wrapped it around the hair and pull it back down into the bead head just a little ways. Use the 1 inch length of pipe cleaner at the top of the head to form a halo.
- Cut a 4 piece of pipe cleaner and wrap it around the pipe cleaner with the head attached to it just below the head so that you have two arms of equal length.
- To make the lace skirt cut a piece of lace 6 long. Sew the top of the lace using the florist wire and bunch the lace together by pulling the wire tight and winding the wire around itself. Make a loop with the remaining length of wire which will be used to hang the angel. (Instead of using the wire loop to hang the angel you can also use the pipe cleaner inside the angel to wrap around a tree branch so that the angel will be standing on a branching instead of hanging from branch.
- To make the silver skirt cut a piece of silver material 5 by 5. Fold it in half. Use the florist wire to sew a straight stitch across the cut edge of the fabric (opposite the fold). Bunch the material together like you did with the lace.
- Insert the bottom of the pipe cleaner through the hole in the top of the lace skirt. Push the arms through the holes in the lace.
- Insert the bottom of the pipe cleaner through the hole in the top of the fabric skirt. Secure it with glue.
- Glue wings onto the back of the angel.
- Glue or tie on a star sequin or bead to the angels hand.
 Angel Hershey's Kiss Party Favor Craft Angel Hershey's Kiss Party Favor Craft
What you will need: Hershey's Kiss candy, aluminum foil, chocolate covered peanuts, powdered sugar.
What to do:
- Cut a strip of aluminum foil about 5 by 2. Crinkle up the center and wrap the foil around the top of the Hershey's kiss. You may want to add a dab a glue to the foil to keep it on the kiss. Spread out the foil to form wings use scissors to shape the wings. Form a cup in the aluminum foil at the top of the Heresys Kiss so that a chocolate covered peanut or raisin will sit inside.
- Mix a small amount of water with the powdered sugar to make a frosting. You can place a small amount of frosting on the bottom of the chocolate covered peanut and place it on the wings and Hershey's Kiss to make it stay in place a little better. Use a cake decorating tool to make a halo on top of the angels head. (If you want to get really creative you can add hair and face feature with other icing.)
 Dog Bone Christmas Dog Craft Dog Bone Christmas Dog Craft
What you will need: Small Dog bone treat, Large dog bone treat, wiggly eyes, ribbon, black felt, brown felt, pink felt.
What to do:
- Cut out some ears from brown felt, a nose from black felt, and a tongue from pink felt. Glue them onto the small dog bone treat.
- Glue the small dog bone treat to the large dog bone treat as shown in the picture. Glue on a Christmas bow to finish.
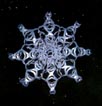 Pop Bottle Ring Snowflake Craft -These snowflakes are very easy to make and use recycled materials. Pop Bottle Ring Snowflake Craft -These snowflakes are very easy to make and use recycled materials.
What you will need: Sixteen pop bottle rings for each snowflake, stapler or tape, and thread or fishing line.
-
What to do:
Place a pop bottle ring in front of you so that the sides of the ring bend upward not under. Fold the holder in half lengthwise and staple point A to point A and point B to point B. Do this for all 16 rings.
-
Staple 8 of the already prepared pop bottle rings together in a circle by stapling point E of one ring to point F of another ring.
-
Staple point C of one ring to point D of the ring next to it. Go all the way around to form a circle. Staple the other 8 rings together to form the other side of the snow flake.
-
Staple the front of the snowflake to the back of the snow flake by lining up the front and back rings and stapling them together at points G, H, and I. You should have a completed snowflake.
-
Tie fishing line of thread at the top to hang.
Snowflakes - Make these beautiful paper snowflakes to decorate
 your tree or windows. Daves Snowflakes Page has many examples of paper snowflakes you can make. He has included patterns you can download and print out. Its as simple as folding the paper and cutting on the lines. He has also included links to other snowflake pages your tree or windows. Daves Snowflakes Page has many examples of paper snowflakes you can make. He has included patterns you can download and print out. Its as simple as folding the paper and cutting on the lines. He has also included links to other snowflake pages
Paper Snowflakes for all Ages - More free snowflake patterns to download and print out. Books for sale with additional patterns.
Other Christmas Crafts on this site
Christmas Crafts Page 2
Clay Star Ornaments
Snowman Paper Doll
Shepherd Puppets and Skit
Clay Gift Tags and ornaments
Angel Paper Chain - (Not on this page)
Links to other Christmas Craft Sites
Christmas Gifts
Bed Buddies
|