Print This Page
Shaker
Angel
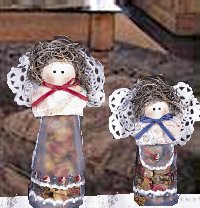
To decorate salt and pepper shakers with
lasting color to match your dinnerware, use paint for non-porous (slick)
surfaces. It will work over the etching. Replace the salt and pepper
lids with wooden balls to create these angels. Fill the inside with rose
hips, potpourri, or bath salts.
Paint Colors You will need:
DecoArt Americana
Avocado
Titanium White
Victorian Blue
Yellow Light
Deep Burgundy
Lamp Black
Hi-Lite Flesh
Brushes:
Round, #1
Flat, #4
Supplies:
B & B Etching Products Etchall Etching Creme*
Wooden ball heads (flat on one side), 1" and 1-1/4" in diameter
Contact paper, clear
Scissors
Spanish moss (hair)
Crocheted doilies, 4" round, white, 2
Thread, heavy-duty
Glue gun and sticks, low-temperature
Potpourri or mini rosebuds
Powdered cosmetic blush, pink
Old quilt or fabric for collars, 1-1/2" x 2-1/2" (small angel),
2" x 2-1/2" (large angel)
Ribbon, dark pink and blue, 6" for each angel
Cord for halo, gold, 6" for each angel
Spray sealer or finish (optional)
Preparation:
The lids for the shakers are not used
for this project.
If needed, widen the large angel apron
pattern to match the lines on octagonal shakers, and adjust the pattern
to fit around the base (it might be easier to trace a hem pattern for each
angel). Trace the apron, hem border, and bib patterns onto contact paper,
leaving an inch or more between the patterns. For easier handling,
cut the patterns apart. Because the etched areas are inside the pattern
lines, you need to make a negative template (stencil) by using scissors
to cut out the center of designs. Peel off the backing. Apply the templates
onto the shakers.
To etch the apron and hem areas, follow
the manufacturer's instructions. Let set for 15 minutes. Using water, rinse
off the crème. Thoroughly dry the shakers.
Painting Instructions:
Apron, Bib, Hems Side-load the #4 brush
with Titanium White. Float scallops on the edges of the etched apron, bib,
and bottom hems. Using a brush handle or stylus, add white dots.
Roses Mix a middle value of Deep Burgundy
+ Titanium White. Using the round brush or a large brush handle, paint
a circle in the bottom center of the small angel's bib. Paint five
along the bottom of the large angel's apron. Let dry.
Using a stylus and Deep Burgundy,
make a dot just below the top edge of each circle (for the bottom of the
bowl of the rose). To make the dark petals on the left side of each circle,
use the round brush to pull three comma strokes from the outside edge toward
the center. Be sure the top stroke is below the dot.
For the light petals on the right of each
circle, mix a light value of Deep Burgundy + Titanium White or add more
white to the middle value. Using the round brush, pull three comma strokes
from the outside edge toward the center.
Leaves: Load the round brush with Avocado.
Make a comma stroke on each side of the roses.
Flowers: These flowers are below the scallops
on the small angel's hem and between the roses on the large angel's apron.
Using the stylus and Victorian Blue, make a circle of five dots for each
flower. Let dry. Dot the centers with Yellow Light. Paint Avocado
comma stroke leaves between the flowers on the small angel.
Heads: Basecoat the wood with Hi-Lite
Flesh. Let dry. Dot the eyes with the stylus and Lamp Black. Let
dry. Using the cosmetic blush, rub on the cheeks.
Finishing: Lightly spray sealer on
the heads. Let dry. Fill the shaker with potpourri. For the collars,
hot-glue the quilt or fabric pieces onto the top of the shakers.
Hot-glue the heads onto the collar. Hot-glue moss onto the heads.
For the halos, make a circle from each piece of gold cord. Hot-glue
onto the hair. Tie the ribbons into bows. Glue one onto each angel at the
chin.
courtesy of
Crafts On-Line
http://colcommunity.tripod.com