![]()
![]()
![]()
![]()
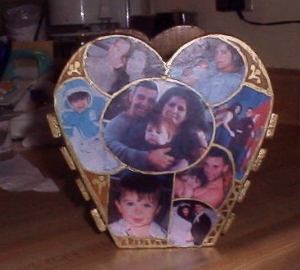   |
Heart Wooden Basket
handmade and designed by:
Eileen
I have been interested in this thing called decoupage but I didn't want to go buy a whole bunch of "supplies" that I will only use once in a blue moon. I found a site by an author of a decoupage book and on his site it said that you CAN use REGULAR ELMER'S GLUE!!!!! So, I decided to go for it.
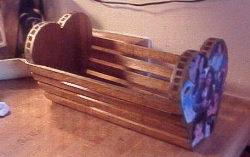
I have a beautiful wooden "basket" (looks sort of like a magazine rack) that I MADE in Junior High School in "mandatory" woodshop anyway the sides are two identical large wooden hearts with a "2x4" bottom (I'm not sure of the real dimensions I am just referring to the type of piece of wood) and 4 wooden slats (about ruler size though slimmer and longer) on the front and back.
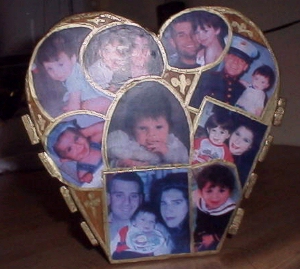
I used my computer to resize some photos. And some of them I cropped into circles instead of squares and rectangles ( I have both a scanner and a digital camera so I have lots of photos in my computer) and I printed them out on regular paper (with the color printer) and then cut them out. I then traced on a piece of paper the heart (from the basket) and tried different arrangements until I was satisfied chose one picture to be the focus and put that one in the center and then arranged the others around it, then I put the pictures on by one onto the wood heart and traced the outlines on the wood and wherever I was overlapping the photos I would trace the outline (of the photo that would be on top) onto the lower photo then I cut out the parts of the pictures that would have been overlapped (to avoid bulk so everything will lay flat)
Then I did something a bit risky but it somehow worked ok I took a LITTLE
bit of "ELMER'S carpenters wood glue" and mixed it with "Elmer's glue-all" (the
white school glue) on a paper plate (I used an old toothbrush) and used that
JUST to coat the wood (the wood was already finished-my dad did it when I
brought it home from school-must have been 10 years ago) anyway I wanted
to make sure the paper would stick so I coated once with the mixed glue and then
THE REST OF THE TIME I USED PLAIN "ELMER'S GLUE ALL". "Elmer's Glue All" will
dry clear, carpenters glue won't so don't let that get on top of the paper!
Then I used the "glue all" to coat the backs of the photos (one by one) and
applied them to the wood then coated the top of them with "glue all" too
I don't have a "brayer" (I don't even own a rolling pin) I used the edge of a
credit card to smooth the paper spread the glue evenly and get rid of air
bubbles -It worked fine now I wasn't sure how much glue to have on top because
even though "Glue all" dries clear if there is too much it wont so I made it
really thin and then to be sure I did a second coat after it was dry. Then I
took a metallic gold calligraphy marker (marker not pen-with a broad "felt-like"
tip) and made outlines of each photos (all of the photos were overlapping each
other so they were interesting shapes) and then outlined the edge of the wooden
heart. I never did this before and I used Only supplies I already had!!! AND
IT WAS EASY!!! You don't have to buy expensive decoupage glues and supplies to
make this project.
Here are recipes for making your own Modge Podge Glue. Cheaper than buying, has the same results.
Modge Podge Glaze
Mix 3 parts white glue (Elmer's or any cheap brand) to 1 part water.
Add more or less water to get the desired texture and thickness.
Add 2 Tbsp. varnish, for shine. Put into container with screw on lid.
Just Like Modge Podge
1/4 c. sugar
1/4 c. non-self rising flour
1/2 tsp. powdered alum
1 3/4 c. water
1/4 tsp. oil of cinnamon
In medium size pan, mix together sugar, flour and alum.
Gradually add 1 cup water, stirring vigorously to break up lumps.
Boil until clear and smooth, stirring constantly. Remove from heat.
Add remaining water and oil. Stir until thoroughly mixed. Put into
container with screw on lid.
Got a Craft Project you'd like to share?
Submit a Project by clicking here.
Help us rebuild our lost site!
![]()
All Craft Graphic images created courtesy of Creative Junction and is for personal use only!


This site provided by Tripod.com